| © 2014 Firstsoft Technologies (P) Limited. | login | Hi 'Guest'
|
Home | SiteMap | Contact Us | Disclaimer |
 |
||||||
Quick Links
Java Program To Demonstrate GridBag Layout |
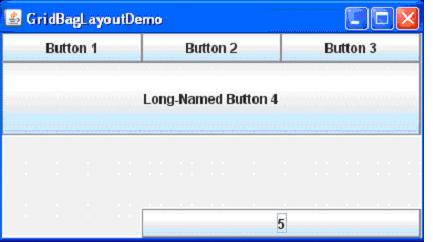
| Algorithm Steps: import java.awt.*; import javax.swing.JButton; import javax.swing.JFrame; public class GridBagLayoutDemo { final static boolean shouldFill = true; final static boolean shouldWeightX = true; final static boolean RIGHT_TO_LEFT = false; public static void addComponentsToPane(Container pane) { if (RIGHT_TO_LEFT) { pane.setComponentOrientation(ComponentOrientation.RIGHT_TO_LEFT); } JButton button; pane.setLayout(new GridBagLayout()); GridBagConstraints c = new GridBagConstraints(); if (shouldFill) { //natural height, maximum width c.fill = GridBagConstraints.HORIZONTAL; } button = new JButton("Button 1"); if (shouldWeightX) { c.weightx = 0.5; } c.fill = GridBagConstraints.HORIZONTAL; c.gridx = 0; c.gridy = 0; pane.add(button, c); button = new JButton("Button 2"); c.fill = GridBagConstraints.HORIZONTAL; c.weightx = 0.5; c.gridx = 1; c.gridy = 0; pane.add(button, c); button = new JButton("Button 3"); c.fill = GridBagConstraints.HORIZONTAL; c.weightx = 0.5; c.gridx = 2; c.gridy = 0; pane.add(button, c); button = new JButton("Long-Named Button 4"); c.fill = GridBagConstraints.HORIZONTAL; c.ipady = 40; //make this component tall c.weightx = 0.0; c.gridwidth = 3; c.gridx = 0; c.gridy = 1; pane.add(button, c); button = new JButton("5"); c.fill = GridBagConstraints.HORIZONTAL; c.ipady = 0; //reset to default c.weighty = 1.0; //request any extra vertical space c.anchor = GridBagConstraints.PAGE_END; //bottom of space c.insets = new Insets(10,0,0,0); //top padding c.gridx = 1; //aligned with button 2 c.gridwidth = 2; //2 columns wide c.gridy = 2; //third row pane.add(button, c); } /** * Create the GUI and show it. For thread safety, * this method should be invoked from the * event-dispatching thread. */ private static void createAndShowGUI() { //Create and set up the window. JFrame frame = new JFrame("GridBagLayoutDemo"); frame.setDefaultCloseOperation(JFrame.EXIT_ON_CLOSE); //Set up the content pane. addComponentsToPane(frame.getContentPane()); //Display the window. frame.pack(); frame.setVisible(true); } public static void main(String[] args) { //Schedule a job for the event-dispatching thread: //creating and showing this application's GUI. javax.swing.SwingUtilities.invokeLater(new Runnable() { public void run() { createAndShowGUI(); } }); } } SAMPLE OUTPUT SCREEN:
|

⇓Student Projects⇓
⇑Student Projects⇑